Model serving

Giới thiệu
Sau khi train được một model tốt, chúng ta cần triển khai model đó để thực hiện inference. Có hai hình thức triển khai model phổ biến là batch serving và online serving.
Cả batch serving và online serving đều có thể xử lý một hoặc nhiều requests. Trong khi batch serving được tối ưu để xử lý số lượng lớn các requests, thường để chạy các model phức tạp, thì online serving được tối ưu để giảm thời gian xử lý trong một lần thực thi. Batch serving thường được lên lịch theo chu kì và chạy offline. Online serving thường được triển khai lên một server dưới dạng RESTful APIs để người dùng có thể gọi tới.
Trong bài này, chúng ta sẽ tìm hiểu cách triển khai model ở cả hai hình thức batch serving và online serving.
Môi trường phát triển
Các bạn làm các bước sau để cài đặt môi trường phát triển:
-
Cài đặt môi trường Python 3.9 mới với các thư viện cần thiết trong file
model_serving/dev_requirements.txt -
Đặt environment variable
MODEL_SERVING_DIRở terminal bạn dùng bằng đường dẫn tuyệt đối tới foldermodel_serving, vàMLFLOW_TRACKING_URIbằng URL của MLflow server. Hai env var này hỗ trợ chạy python code ở foldermodel_serving/srctrong quá trình phát triển.
Các MLOps tools được dùng trong bài này bao gồm:
- Feast: truy xuất Feature Store
- MLflow: ML Metadata Store, Model Registry
- Airflow: điều phối batch serving pipeline
Note
Trong quá trình chạy code cho tất cả các phần dưới đây, giả sử rằng folder gốc nơi chúng ta làm việc là folder model_serving.
Batch serving
Batch serving được thiết kế với input là data file ở local hoặc cloud. Bạn có thể chỉ cần viết vài script để load input, load model, chạy predictions và lưu lại chúng. Tuy nhiên, chúng ta cũng có thể coi batch serving là một pipeline, sử dụng Airflow để quản lý và lên lịch cho quá trình chạy batch serving. Batch serving pipeline gồm các tasks như hình dưới:
flowchart LR
    n1[1. Cập nhật<br>Feature Store] --> n2[2. Data<br>extraction] --> n3[3. Batch<br>prediction]
Cập nhật Feature Store
Giả sử nơi chạy Batch serving là ở một server với infrastructure đủ mạnh cho việc tối ưu batch serving. Khi chạy batch serving, data được lấy từ Feature Store để phục vụ cho inference. Do đó, Feature Store cần được cập nhật trên server nơi batch serving được triển khai.
Task này được thực hiện giống như task Cập nhật Feature Store ở training pipeline. Bạn có thể xem lại bài Xây dựng training pipeline. Bạn hãy làm theo các bước dưới đây để cập nhật Feature Store.
- Code của Feature Store nằm tại
data_pipeline/feature_repo. Để triển khai sang batch serving pipeline, chúng ta sẽ copy code từdata_pipeline/feature_reposangmodel_serving/feature_repo. Bạn hãy chạy các lệnh sau.
cd ../data_pipeline
make deploy_feature_repo # (1)
cd ../model_serving

cd feature_repo
feast apply # (2)
cd ..
- Triển khai code của Feature Store
- Cập nhật Feature Registry và Offline Feature Store của Feast
Data extraction
Task Data extraction có đầu vào và đầu ra như sau:
- Đầu vào: data được đọc từ Offline Feature Store. Data sẽ được xử lý theo format mà model yêu cầu để tiện cho task Batch prediction tiếp theo
- Đầu ra: data đã được xử lý và được lưu vào disk
Code của task này được lưu tại model_serving/src/data_extraction.py.
- Khởi tạo kết nối tới Feature Store
- Đọc file data nằm tại
model_serving/data/batch_request.csvchứa các records mà chúng ta muốn chạy prediction - Lấy ra các features
conv_rate,acc_ratevàavg_daily_trips driver_statslà tênFeatureViewmà chúng ta đã định nghĩa tạidata_pipeline/feature_repo/features.py- Bỏ các cột không cần thiết
- Lưu
batch_input_dfvào disk
Bạn làm các bước sau để test thử code.
-
Chạy code
-
Kiểm tra folder
model_serving/artifacts, bạn sẽ thấy filebatch_input.parquet
Batch prediction
Task Batch prediction có đầu vào và đầu ra như sau:
- Đầu vào: config file chứa thông tin về model được dùng
- Đầu ra: kết quả predictions được lưu vào disk
Model được dùng là model đã được lưu vào MLflow Model Registry ở task Model validation trong bài Xây dựng training pipeline. Trong task Model validation đó, thông tin về model đã đăng ký được lưu tại file training_pipeline/artifacts/registered_model_version.json. File này cần được upload vào một Storage nào đó trong tổ chức để các task khác, cụ thể là cho batch serving và online serving ở trong bài này, có thể biết được model nào là tốt nhất.
Vì chúng ta đang phát triển cả training pipeline và model serving ở local, nên bạn chỉ cần copy file training_pipeline/artifacts/registered_model_version.json sang model_serving/artifacts/registered_model_version.json. Để làm điều này, bạn hãy chạy lệnh sau.
Tiếp theo, chúng ta sẽ viết code cho task batch prediction. Đoạn code này giống như ở task Model evaluation trong bài Xây dựng training pipeline. Code của task này được lưu tại model_serving/src/batch_prediction.py.
model_urichứa URI của model đọc từ filemodel_serving/artifacts/registered_model_version.json- Load batch input file được lưu ở task trước, nằm tại
model_serving/artifacts/batch_input.parquet - Load model signature
- Sắp xếp các features theo đúng thứ tự mà model yêu cầu
- Chạy inference
- Lưu output vào disk
Bạn làm các bước sau để test thử code.
-
Chạy code
-
Kiểm tra folder
model_serving/artifacts, bạn sẽ thấy filebatch_output.parquet
Airflow DAG
Ở phần này, Airflow DAG sẽ kết nối các task trên thành một pipeline. Code định nghĩa Airflow DAG được lưu tại model_serving/dags/batch_serving_dag.py.
- Chi tiết về những điểm quan trọng cần lưu ý, mời bạn xem lại bài Xây dựng training pipeline.
Tiếp theo, chúng ta cần build docker image mlopsvn/mlops_crash_course/model_serving:latest và triển khai Airflow DAGs bằng cách các bước sau.
-
Đăng nhập vào Airflow UI với tài khoản và mật khẩu là
airflow. -
Đặt Airflow Variable
MLOPS_CRASH_COURSE_CODE_DIRbằng đường dẫn tuyệt đối tới foldermlops-crash-course-code/ -
Chạy lệnh
- Copy
model_serving/dags/*vào folderdagscủa Airflow
Tip
Định nghĩa về các env vars được dùng trong quá trình chạy Airflow DAG được lưu tại
model_serving/.env. Bạn có thể thay đổi nếu cần. - Copy
-
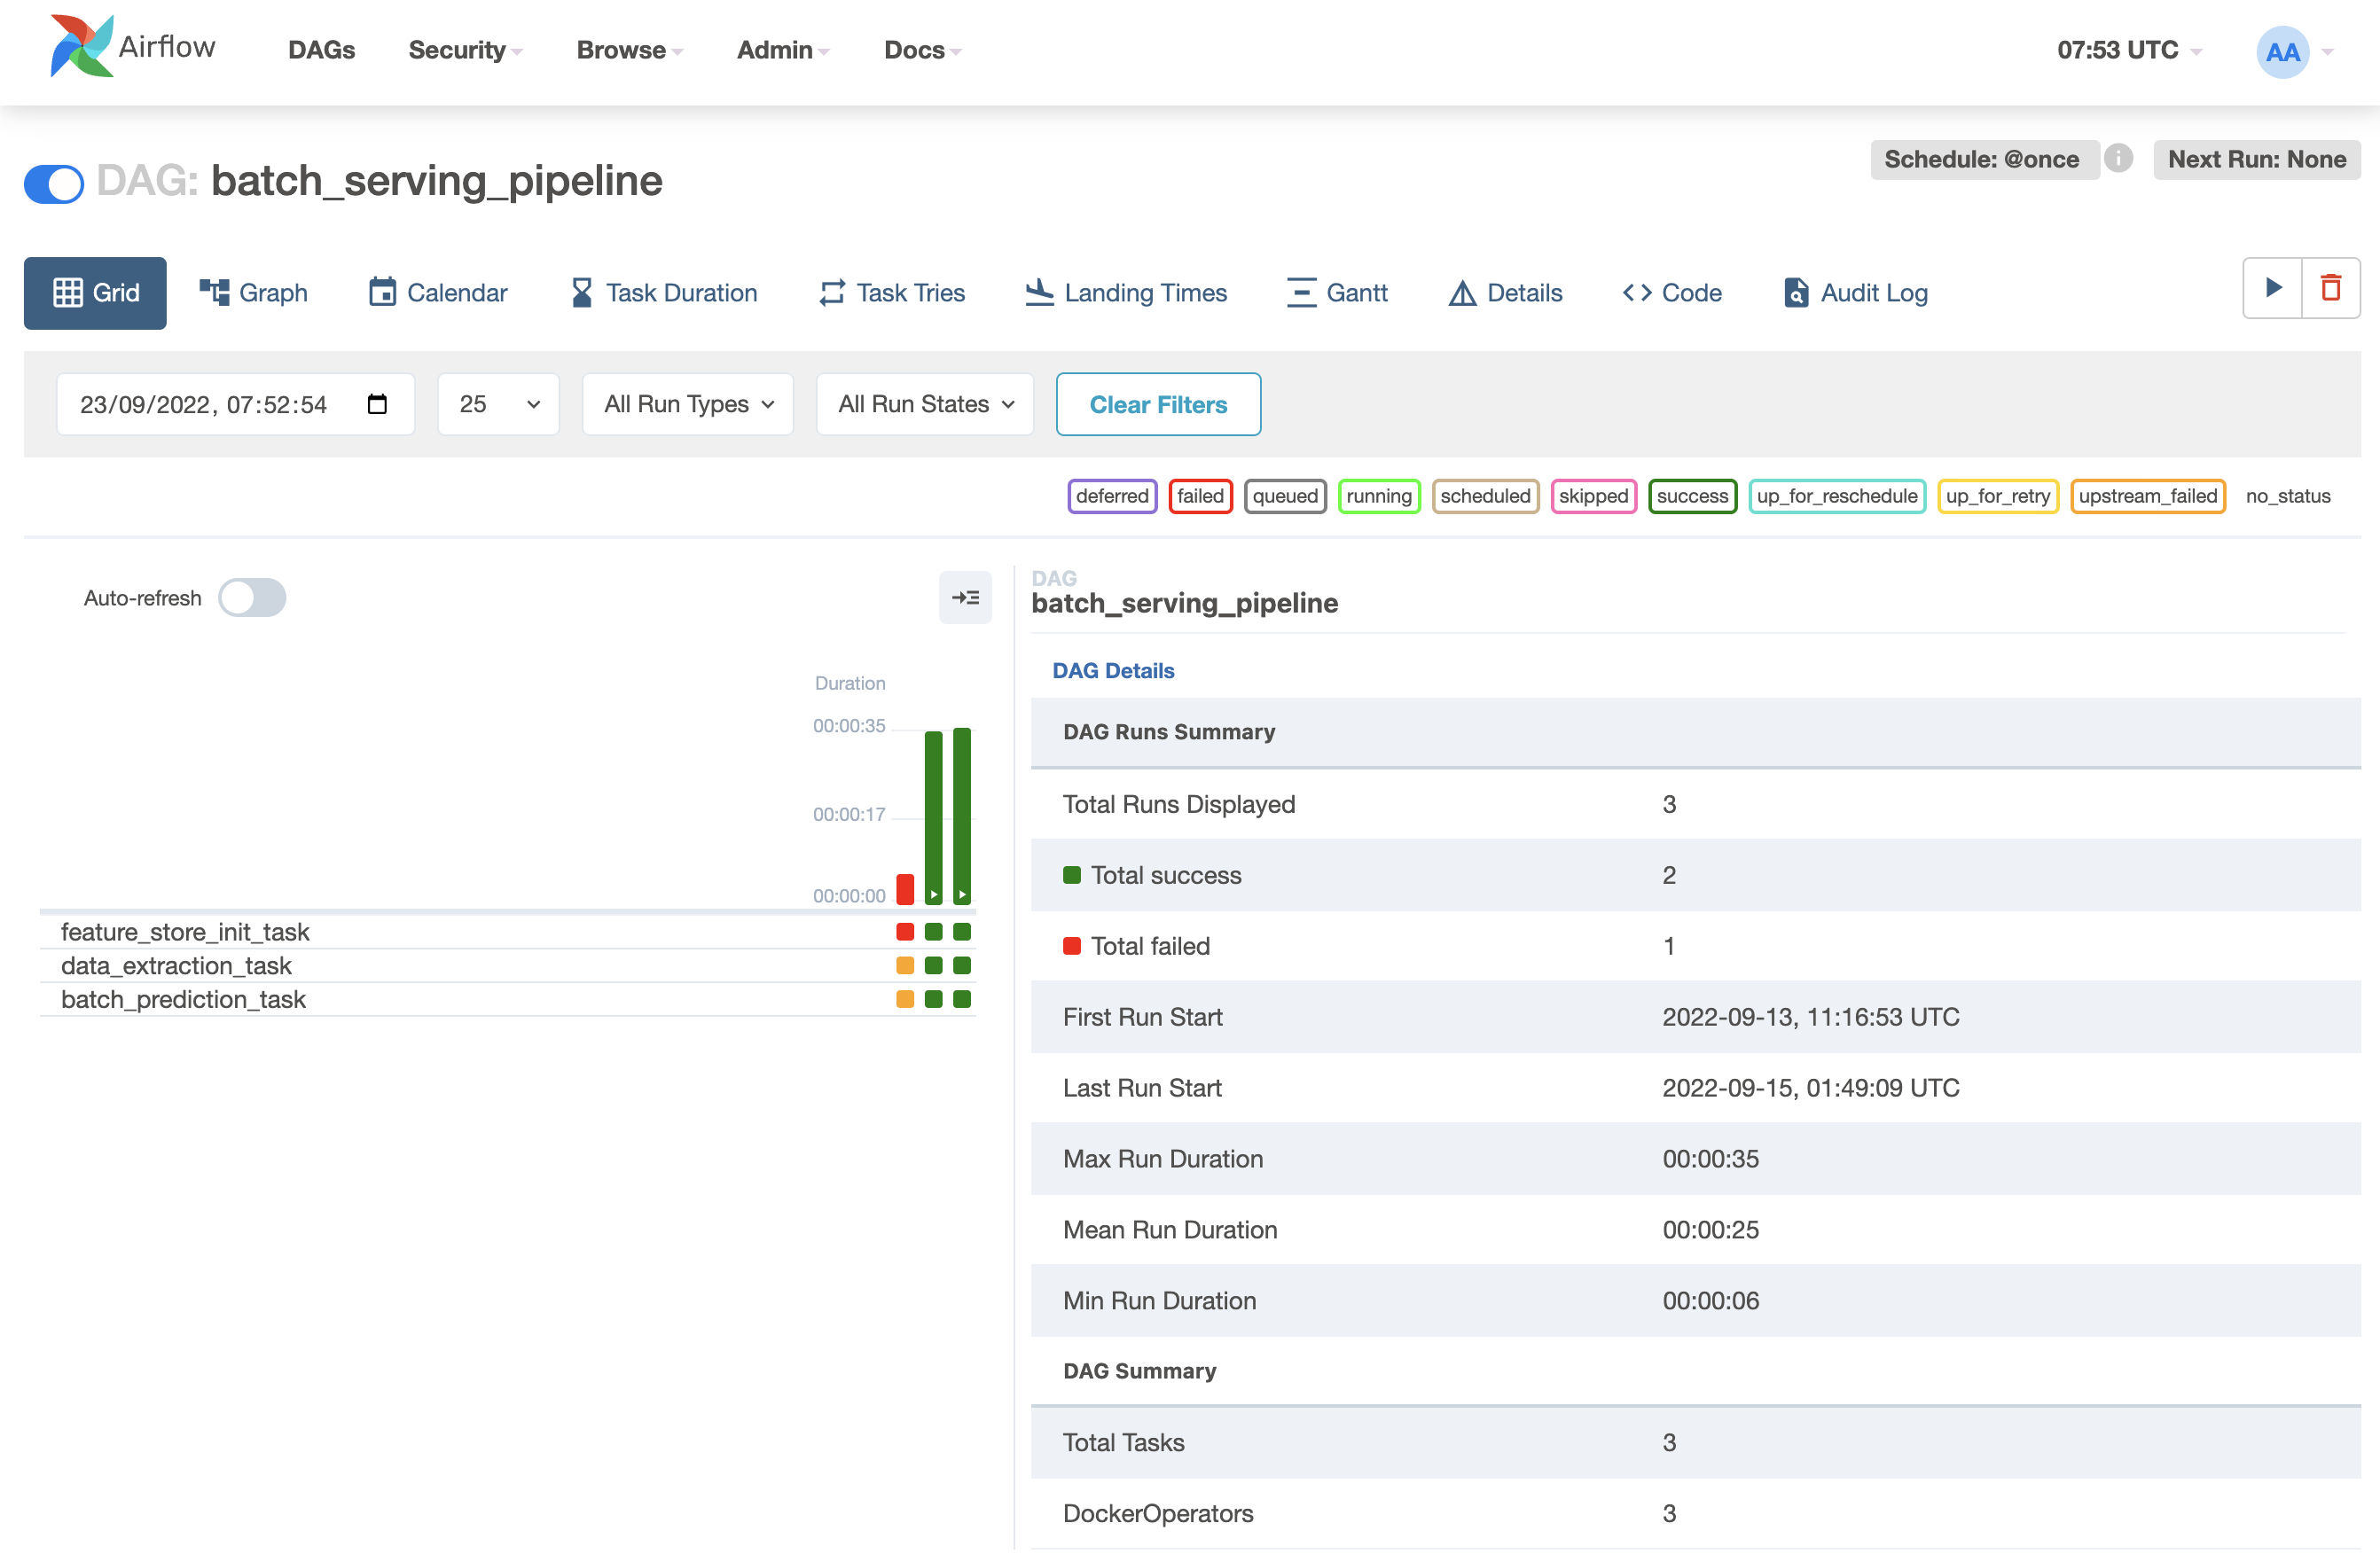
Kích hoạt batch serving pipeline và đợi kết quả
Online serving
Khi triển khai Online serving hay Online serving service, thường thì bạn sẽ dùng một library để xây dựng RESTful API, ví dụ như Flask hoặc FastAPI trong Python. Trong phần này, chúng ta sẽ dùng một library chuyên được dùng cho việc xây dựng online serving cho ML models, đó là BentoML. Code của online serving được lưu tại model_serving/src/bentoml_service.py.
- Download model từ MLflow server
- Lấy ra sklearn model
- Lưu model về dạng mà BentoML yêu cầu
model_nameđược lấy từ filemodel_serving/artifacts/registered_model_version.json- Signature của model, thể hiện hàm mà model object sẽ gọi
- Key
predictlà tên hàm mà model sẽ gọi. Vìsklearnmodel dùng hàmpredictđể chạy inference nênsignaturescủa BentoML sẽ chứa keypredict - Thông tin thêm về key
batchable. Đọc thêm tại đây. - Lưu bất kì Python object nào đi kèm với model. Đọc thêm tại đây
- Lưu thứ tự các features model yêu cầu.
feature_listđược lấy ra từ metadata của model đã lưu ở MLflow - Tạo BentoML Runner và BentoML Service. Quá trình chạy inference thông qua một BentoML Runner. BentoML Service chứa object BentoML Runner, giúp định nghĩa API một cách thuận tiện
- Khởi tạo kết nối tới Feature Store
- Hàm
predictđể thực hiện inference - Định nghĩa input class cho API
- Định nghĩa output class cho API
- Định nghĩa input và output ở dạng json cho API
- Đọc features từ Online Feature Store
- Loại bỏ cột không cần thiết
- Sắp xếp thứ tự features
- Lấy ra ID của tài xế có khả năng cao nhất sẽ hoàn thành cuốc xe. ID này được trả về trong response
- Đoạn code liên quan tới monitoring sẽ được giải thích trong bài tiếp theo. Bạn hãy tạm thời bỏ qua đoạn code này
Để triển khai online serving API trên máy local, docker compose sẽ được dùng. Online serving API sẽ được gọi qua port 8172.
Info
Port 8172 được định nghĩa tại model_serving/deployment/.env.
Bạn làm các bước sau để triển khai Online serving service.
-
Chạy Online Feature Store bằng cách vào repo
mlops-crash-course-platformvà chạy lệnh sauInfo
Online Feature Store thực chất là một Redis database. Các bạn xem file
feast/feast-docker-compose.ymltrong repomlops-crash-course-platform -
Cập nhật Online Feature Store. Xem lại bài Xây dựng data pipeline
-
Build docker image và chạy docker compose
Tip
Định nghĩa về các env vars được dùng trong quá trình build image được lưu tại
model_serving/deployment/.env. Bạn có thể thay đổi nếu cần. -
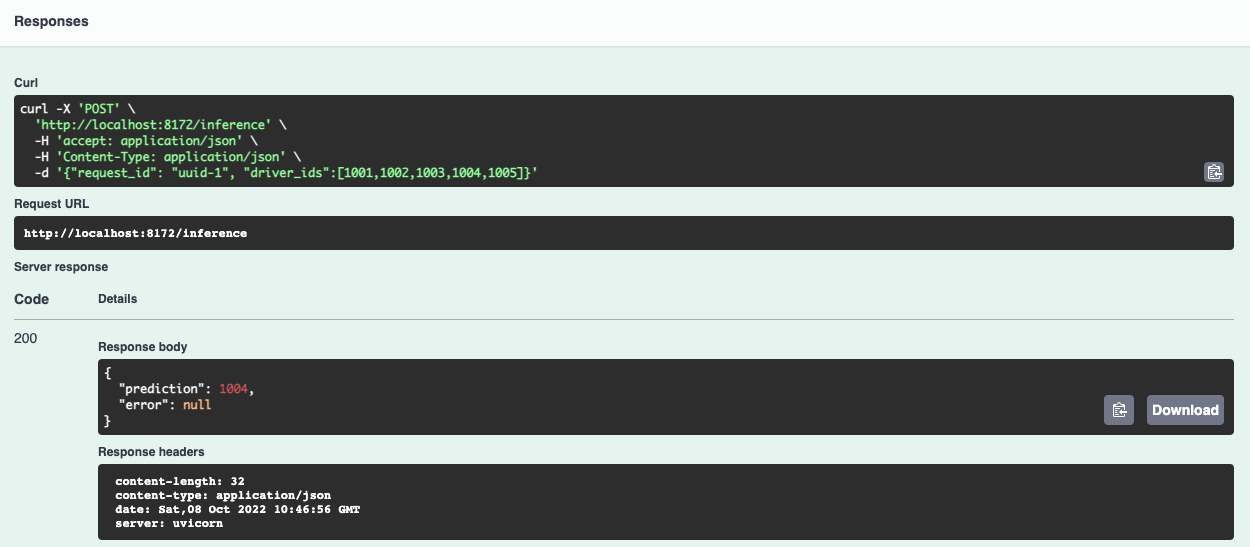
Truy cập http://localhost:8172/, mở API
/inference, clickTry it out. Ở phầnRequest body, bạn gõ nội dung sau:Kết quả của response trả về sẽ giống như sau.
Tổng kết
Chúng ta vừa thực hiện một loạt các quy trình điển hình để triển khai batch serving và online serving. Code để chạy cả batch serving và online serving sẽ phụ thuộc vào model mà Data Scientist đã train và các features được yêu cầu cho model đó. Do đó, batch serving và online serving code cũng sẽ được cập nhật theo yêu cầu của Data Scientist.
Sau khi tự động hoá batch serving pipeline và triển khai online serving service, trong bài tiếp theo chúng ta sẽ xây dựng hệ thống giám sát online serving service. Hệ thống này rất quan trọng trong việc theo dõi system performance và model performance, giúp chúng ta giải quyết các vấn đề ở production nhanh hơn và cảnh báo khi có các sự cố về hệ thống và model performance.